| ||||||||
| ||||||||
Monday, April 11, 2011
การทำโบเก้


 บันทึกการเข้า


 เมื่อตะกี๋ บอร์ดเน่า พิมพ์ไว้ตั้งแยะ
 ชอบๆ ขอบคุณน้าโกะ โม้แหลกนะครับ
Wednesday, February 16, 2011
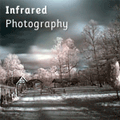
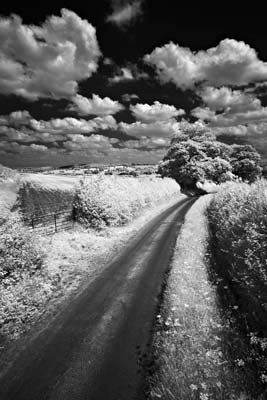
Shooting Infrared with Digital Cameras
Simpler than film-based infrared, digital infrared photography creates fascinating pictures.
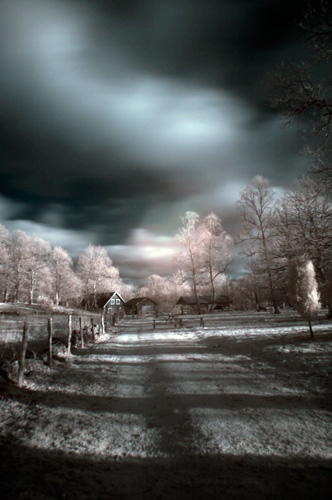
 | Near Hanksville, Utah, taken during one of my workshops. D1x, Nikkor 20mm f/2.8 with Hoya 72 infrared filter. 5 second exposure (which generated noise in the dark areas). Brought into Photoshop, curves applied, slightly sharpened, then a more patterned noise added using Texture. |
Infrared is a spectrum of light beyond that which we normally see. Despite having an IR blocking filter installed between the lens and the CCD, most digital cameras still react to some near infrared energy, though at levels far lower than visible light. To take “infrared” pictures—i.e., photos primarily made up of near infrared energy—you need to filter out the visible light and only allow the near infrared and infrared spectrum through to the film or sensor. The easiest way to do this is to use a Wratten filter, which you can find at most professional camera shops (see sidebar at right).
The Wratten series (and other dedicated "infrared filters" [misnamed because they don't actually filter infrared]) are very dense filters, nearly opaque. Because they block most or all of the visible light, you’ll need very long exposures, so you’ll want to use a tripod.
Generally you should set your digital camera to B&W mode if it has one, as infrared filters remove most of the usable color information (it is amusing to bring a color infrared image into Photoshop and run Auto Levels on it, however). This best mimics the old style B&W infrared films that were used. Also, note that incandescent lamps don’t put out much near infrared (heat is thermal energy, not infrared light), so you’ll probably want to start your experiments with landscapes. During the day there is plenty of near infrared available to record images with.
One other problem you’ll discover, though, is that once you filter all the visible light, exposure times will be quite long. On a Coolpix 950 I get 1/2 second exposures or longer, while on my D1x I find my exposures are often measured at five seconds or longer. This brings out an important issue: some cameras work better for near infrared photography than others. In general, the newer your Nikon DSLR is, the less likely it is suited to near infrared work; Nikon keeps tweaking the filter over the sensor to bar more and more near infrared, which extends exposures longer and longer with external filters (the solution is to have a camera converted to near infrared only--see right side bar). Many of us keep older D100 bodies around because it is probably the best suited to external filter infrared work. Likewise, the old Coolpix 950 was better than, say, the Coolpix 995, so you'll see a lot of dedicated infrareders still using the older body.
Here’s one set of steps to try:
- Focus. Once the filter is on, you won't be seeing much of anything until after the exposure, so focus is your first priority. Infrared light focuses at a slightly different point than visible light, so make sure that you use an aperture in Step 6 that has a decent depth of field. If your lens is one of those that has an infrared focus mark on it, first focus normally, then adjust to that mark.
- Place the infrared filter in front of the lens.
- Set the camera to manual exposure mode. I've found that the meter in most Nikon cameras, at best, does only a fair job of infrared exposures. Personally, I almost always have to set exposure manually to get the proper exposure.
- Set the camera to shoot B&W only. Optional: you can perform this step later; but it's easier to evaluate exposure with the camera set to B&W if that's how you'll print the image. (Note that if you shoot raw, you'll still have the color information--only the preview image is generated in black and white.)
- Set the camera to a higher ISO rating than usual. I usually set ISO 400 on my D1x. You'll be balancing ISO-generated noise with long shutter speed generated noise. On a D1, try to keep your exposures under 5 seconds; on a Coolpix, try to keep them under 2 seconds. With later cameras, you might need to set Long Exposure Noise Reduction to reduce hot pixels.
- Set the exposure. Take a test exposure and examine the histogram. Since you're usually printing the final image in black and white you'll need a wide histogram that ranges from nearly pure blacks to nearly pure whites. Be careful at the bright end, however--foliage has a tendency to go absolute white in infrared, and you must retain enough working room to keep detail (e.g., don't let the histogram extend off the right side!). Adjust your exposure until you've got the broadest, workable histogram.
- Take your shot!
Once you’ve taken an infrared shot, you’ll probably want to manipulate it a bit to make it better emulate the look of infrared film, which has unusual "color" (white foliage, for example) and a bit of graininess and bloom to edges. With Photoshop, try the following:
- Remove the color, if any. If you’re working with a color image, selectDesaturate from the Adjust submenu on the Image menu. Alternatively, you can also choose Grayscale from the Mode submenu on the Imagemenu, but this doesn't generate the best results.
- Balance the image levels. The picture directly from your camera may look strange, as, despite your exposure efforts, it may still have most of the image data all bunched up at one or both ends of brightness range. Novices: select Auto Levels from the Adjust submenu on the Imagemenu. If you’re an advanced Photoshop user and want to preserve image data and get finer control, select Curves instead of Auto Levels, and adjust manually.
- Sharpen the edges. The results so far will probably be somewhat softer than usual, so select Unsharp Mask from the Filter menu. Try starting at values of 100 for Amount, 2 for Radius, and 1 for Threshold, and then tweak as desired. Better still: use the Smart-Edge technique I describe in my Sharpening article.
- Make it look grainy. Traditional infrared film is sharp, but grainy. To add grain, choose Add Noise from the Noise submenu on the Filter menu. Start with values of 20% and Uniform and tweak as desired. Alternatively, select Grain from the Texture submenu on the Filter menu. Start with values of Soft, 15% Intensity, and 50% Contrast and tweak as desired.
- Add edge glow. Traditional black and white film tends to have an unnatural glow around edges, especially bright ones. Select Diffuse Glow from theDistort submenu on the Filter menu. Start with values of 6 for Graininess, 5 for Glow Amount, and 20 for Clear Amount.
Tip: Try these Photoshop steps with a regular, non-infrared image. You might be surprised by the results! (hint: before converting the image to black and white, try modifying the color channels individually, by lightening the red channel and darkening the blue.)
DSLR Infrared
DSLR users have a wide choice of dedicated infrared filters, in a range of sizes. I've tried a number, but I like the Hoya 72 best. Generally, the number in the filter name is an indication
Coolpix Infrared
Getting Started with Infrared Photography
Infrared photography looks like nothing else. I’m sure you’ve seen some IR photos around the web, but maybe you don’t know how to achieve this special effect? Look no further, here’s a guide on what to think about when choosing your object, how to shoot and what to do in post-production.
Photography is the art of capturing light, IR photography on the other hand is the art of capturing invisible light — but the challenge comes with its benefits, IR photographs can be really attention grabbing and otherworldly.
What you need
 First of all you need to have a D-SLR camera with a lens that can use filters. Then you need to purchase an IR-filter, there are a few out there and the main difference (assuming we’re looking at the same brand) is the range of wavelengths that the filter lets through.
The IR filter I use is the Hoya R72, all the IR photographs in this article are taken using that filter. I’m very happy with this filter, but since it’s the only one I’ve tried I can’t recommend it above any other one.
Another piece of equipment that is crucial is the tripod. With D-SLR cameras it’s impossible to take IR photographs without proper stabilizer. Sure, I guess you could have your camera placed on a table or a solid rock, but the best way is no doubt to get a good tripod. Since we’re going to be using a slow shutter speed, long exposure, the tripod needs to be very stable.
Different lenses handles IR photography differently, and in this case it’s not necessarily decided by the price of the lens — these lenses are not designed for IR photography and therefore some of them just doesn’t work very well in this field.
The Canon kit-lens, 18-55mm f/3.5-5.6, for example will create a hotspot in the center of the photograph as seen in the photograph above. This is an effect that only appears on some lenses. If you’re serious about IR photography you might want to consider purchasing a lens that works well with IR — if so, there are several websites that have lists of good/bad IR lenses.
What do I photograph?
First and foremost, you need to understand the concept of capturing invisible light, invisible to the human eye that is. The world looks totally different in Infrared, and there are a few things to think about.
A blue sky will appear black, or very dark, while foliage will get a distinct white color. This creates amazingcontrast in the image that makes the photo ‘pop’. Due to the long exposure time, portraits and other non-static sceneries can be hard to capture, this is one of the reasons why most IR photographs are landscape shots.
You need to test and see what you can come up with; it can take a long time before you fully grasp the idea of capturing and composing with infrared light.
How to photograph
I would like to say something like “and now to the fun part” but in this case the photo shoot itself can be rather annoying and/or time consuming. Don’t get me wrong, IR photography is fun, but the way you have to shoot when you’re using an unmodified D-SLR camera is far from an optimal solution.
When the filter is attached to the lens you will most likely see nothing in the viewfinder. The filter is designed to block visible light and it does so quite well. This will result in two hassles — you cannot see what’s in frame and what’s not, nor can you see what’s in focus. The best way to solve the first problem is to set up your tripod and find a good composition before attaching the IR filter.
The focus distance is not the same for IR light as it is for visible light, so you will have to re-focus after the IR filter is attached. This can be really troublesome since you won’t see anything in the viewfinder, older lenses might have a special IR focus distance listed, but modern Auto Focus (AF) lenses does not have this. The best solution is to have the camera auto focus with the IR filter on, or step down the aperture enough to get focus the entire distance.
Now you’re set to go, but your cameras exposure meter isn’t working correctly so you will have to use manual exposure. Most IR photographs I’ve taken have had an exposure time between 10-30 seconds. With these long exposure times we not only risk getting motion blur but also heavy noise levels. The longer the exposure the more noise will be created, that’s not specific for IR photography but a general rule in photography. Use the lowest ISO setting to try and keep the noise level as low as possible.
Post-production
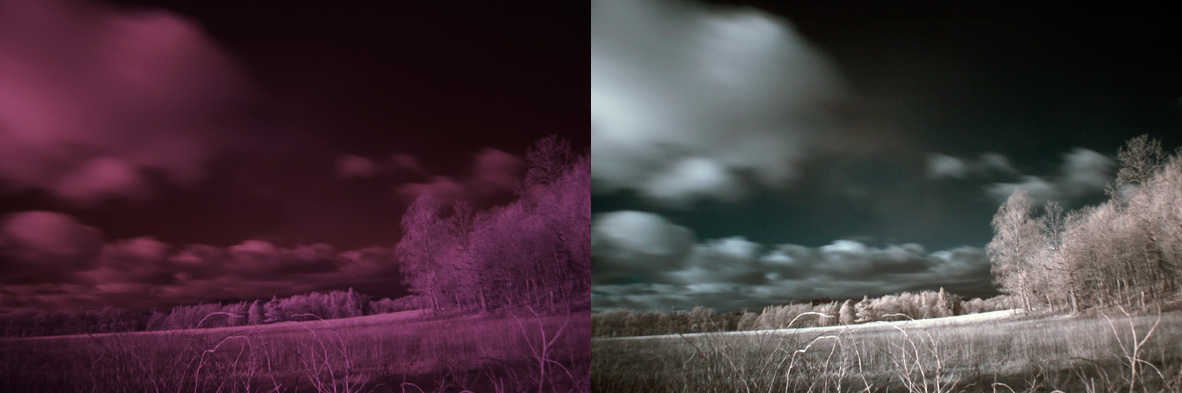
What the outcome will look like depends on what filter you used and how the camera handles IR light.
If you use a filter like the Hoya R72 that I use your result will be heavily red/magenta tinted images. This is what’s called “false colors“, and it can be fixed in Photoshop, which is what I will show in this part of the article.
Open your IR photo in Photoshop. The first thing we want to do is to use a feature called Channel Mixer. Create a new adjustment layer and select Channel Mixer. You can now control the channels RED, GREEN and BLUE. What we want to do is switch the Red and the Blue channel.
Select Red and drag the Red setting to 0% and drag the Blue setting to 100%
Select Blue and drag the Blue setting to 0% and drag the Red setting to 100%
You can also experiment with changing the Green channel or such as well, find a good mix for every scenery.
You should now have removed that heavily tinted red/magenta color from your photograph, but the current look might not be much better either.
What you want to do now is play around with the Levels and Curve settings, if you’re new to these adjustment tools you can always hit Auto and see if you like the outcome.
This was a very quick guide on how to change that false color in Photoshop, but there isn’t any magic number that works for all photographs — you will just have to test and see. Then again, that’s basically what IR is all about in the beginning, this is a technique that takes some time getting used to and it will involve a lot of not so perfect shots. Don’t give up — the results can be astonishing!
(I’m by no means talented in IR photography, these examples are very basic but hopefully they give you a feel for this style.)
How to Take Infra Red Photos

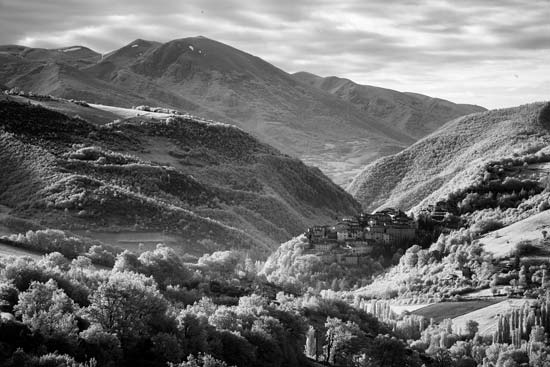
I'm on a campsite in Provence. Under an azure blue sky I'm seeking shade to look on the laptop at some Raw files I shot today of a village perche high in the Alpes Maritimes under the harsh light of early afternoon. They're all red and flat as a pancake. Doesn't sound promising, does it?
Take one perfectly good digital SLR camera and modify it so it's not receptive to visible light. Then go out into the field and endeavour to make stunning and perceptive landscapes using light you can't see. Then try and explain why and how to friends and family. It's not, it has to be said, a seemingly entirely logical thing to do. Welcome to the world of infra red photography.
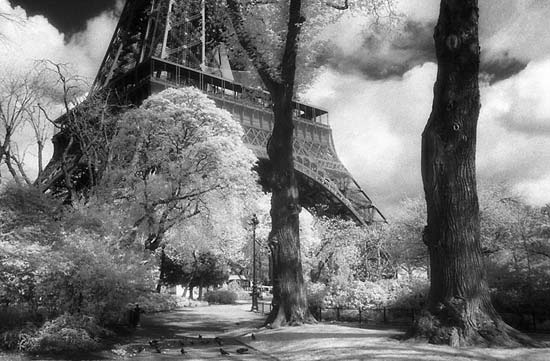
Now I'll bet my last stale croissant that most of you reading this know at least a bit about infra red photography, it's been a technique that's been around for yonks, it's nothing new. Scientists in white lab coats have long been doing it for strange and nefarious reasons, and Wildlife Wallahs love exposing frolicking lions at night using infra red sensitive cameras with long lenses. For us arty landscape types that infra red look to monochrome imagery is well known, it graced many an album cover in the 80's. Back in the 90's I had quite an infra red phase to my life, most notably with a Parisian project involving much meandering along the banks of the Seine with a Nikon loaded with Kodak's quirky infra red monochrome emulsion.
It was great fun and now a decade or so later, I'm back in infra red mode. Why? Well it pays to keep experimenting and evolving, otherwise I feel all my pictures would start to look the same. And now, with the ability to shoot IR digitally, things have moved on. Its even more fun, gives a unique look, and now in the digital age the potential for IR imagery has expanded massively. But I have to tell you it's not easy; it requires a whole new way of thinking and looking at this mostly blue and green world around us.
So let's go back to basics and consider just what infra red photography is all about. Now answer me this, just how much science does a photographer need to know? Not much? It's true some photographers know bugger all about the physics of it all, they just use the camera, know what works for them and create great pictures. But, but, but…. I reckon if a photographer has a working knowledge of what is happening when the shutter is released it is an asset. It helps to analyse what's gone wrong when pictures don't work, and it's useful to understand what is and isn't possible. Would Michael Schumacher have been quite so successful if he didn't have a thorough understanding of his car over and above his innate talent and feel for driving red cars fast? First and foremost I think it's crucial for a photographer to understand light.
So what is infra red light? Think of the cover to Pink Floyd's seminal 70's album (showing my age here?) Dark Side of the Moon. It shows white light being refracted through a prism, displaying the entire visible spectrum; violet, indigo, blue, green, yellow, orange, red. That's the range we can see with the naked eye, and so when Louis Daguerre and Fox Talbot were concocting their first light sensitive emulsions back in the 19th Siecle the aim was to replicate the sensitivity of the human eye, and that, by and large, is what films and now digital sensors have done ever since. But beyond the two ends of the spectrum there is light bouncing around the atmosphere that we can't see; ultra violet at one end, and infra red at the other. Many animals can see these rays; kestrels use ultra violet sensitive vision to see vole pee. But we can't. So why should we try? I don't need to see vole pee.
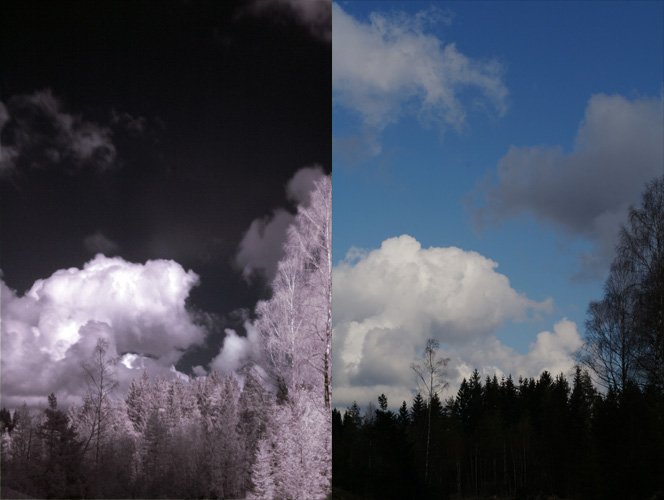
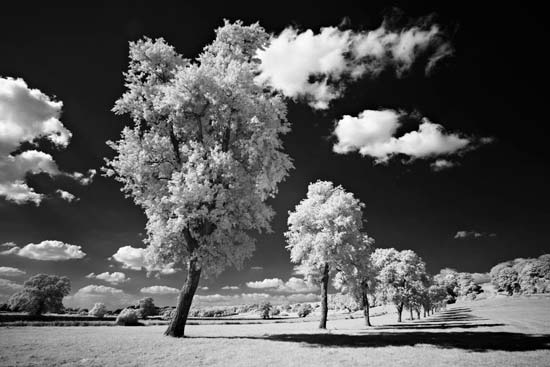
‘Cos it looks neat. Your classic infra red monochrome landscape has white clouds against black skies and seemingly luminescent foliage. Impact, un je ne sais quoi, a definable look. Minute particles in our atmosphere reflect the shorter wavelengths at the blue end of the spectrum. It's why the sky here in Provence looks so blue. It doesn't happen quite so much in Merseyside but you get the idea. The UV light so dispersed causes haze, a landscape photographer's curse, but the longer wavelengths at the infra red end slice straight through the atmospheric grot, giving IR landscapes a clarity totally devoid of haze for even distant views. And as those same longer IR wavelengths are not reflected by the tiny floating jobbies in the atmosphere, they pass into space unmolested and lost to the world, so skies appear black. In spring and early summer all the photosynthesis going on in plants causes leaves to reflect infra red, so foiliage looks almost white. And this is just the start. Learning how different subjects reflect and transmit IR light is all part of the game. Photographically it's a whole new world.
So enough theory, how's it work in practise? In the film era shooting IR was a somewhat haphazard affair. The film had to be loaded in total darkness. I don't want to think about what the chambermaid at my Paris hotel thought when she disturbed me fumbling under the duvet behind drawn shutters in the middle of the day with a Nikon FM2 and a roll of 35mm Kodak IR film. Exposure was a matter of guesswork; 1/125th @ f11 and bracket like mad. Ditto focusing, I had to manually offset the focus point by…well, a bit, and hope the small aperture would save my bacon. It worked, but the film was horrendously soft and grainy. That I guess was all part of the look. But now My Life Has Changed.
I've had my “old” Canon 1Ds mkII converted for infra red. It's a one way process; this camera can now only be used for IR work. I take a picture and all I get on the monitor is a red image. But with this conversion I can shoot, meter exposures and focus just as normal. Forget about using IR filters, if you want to do digital IR photography this is the way to go. And let's face it; even though the 1Ds mkII has been left behind by more recent cameras it is still capable of producing a big 16.7 megapixel full frame high resolution image that makes the old 35mm IR film look pretty sick. I am excited. It's official.
OK, a bit more theory, then I'm done. Digital sensors are actually sensitive to infra red. This is generally undesirable for normal photography, it can cause nasty fringing, so the manufacturers build into the sensor a filter to block those infra red rays. So to make a camera sensitive to infra red only the IR filter needs to be removed and replaced with one to cut out the visible spectrum. The focusing plane also needs to be off set to deal with the longer wavelengths. Simple really, but not a job you'd contemplate attempting with tweezers on the kitchen table. So the camera has to be sent off for a professional conversion. I used Advanced Camera Services, (link to http://www.advancedcameraservices.co.uk/) they were slow and insisted on calling me Norton but now it's done. Once I'd decided to go for The Change it was a lot less traumatic then going to the dentist or cleaning the sensor.
This summer here in Provence and down the leafy lanes of Wessex I shall be pushing the boundaries of my infra red vision. It is a strange game. I'm composing pictures using light I can't see. Practice and experimentation is the order of the day. Leafy trees against black skies work well. As with all photography simple bold compositions always stand out. Of course the direction and angle of the light is still key, but there's been a big change from my normal way or working in landscape mode at dawn and dusk. The fact is IR photography doesn't really work with the subtle low contrast lighting of Happy Hour, strong, bright sunlight is needed. I'm finding myself exposing in the middle of the day! The high contrast nature of the light at lunchtime normally makes that a complete no no, but IR work needs that contrast. Skies are crucial, towering fluffy cumulonimbus can make the shot. Those of you who have watched my DVD Chasing the Light (link to http://www.davidnoton.com/ctlfilm.htm) will know all about the whole routine of how my pictures come together; that process of scouting locations, previsualising an image then returning when the conditions and light are just right. All of that holds true for IR photography, it's just that the previsualisation is that much more difficult and the type of lighting that works best is different.
Exposure-wise things are so much easier than my Parisian Walkway days of guessing and bracketing. I use AE evaluative metering and check the histogram after every shot. Beware; it is very easy to clip the highlights in the red channel. As for assessing the image on the monitor, well, it's not easy. If you've a Mono Picture Style setting on the converted camera that will help. I don't, so I'm looking at a petty flat red image displayed on the now seemingly tiny 1Ds mkII monitor. As all photography it goes without saying the way to go is to shoot RAW. The image will need a bit of work doing on it both at the RAW conversion stage and in Photoshop to convert it into a punchy black & white print.
Back in the digital darkroom I try and do as much as I can to the image at the RAW conversion stage. I use Phase One's Capture One 4 Pro (hands up, who dreamt that name up?) There are lots of theories about how best to convert a colour image to monochrome; essentially it boils down to the options of using the channel mixer or simply desaturating. In this case virtually all the information is in the red channel so there's no point in using the channel mixer, a simple destauration of all the IR images in one batch is a good way to start to asses which pics have balls. Even when all the images are shot in strong bright light the first impression is of a flat set of pictures. But just look at those clouds, and skies, and trees! Even after nearly 25 years as a pro I still get a buzz from this, it's the same magic that transfixed me watching the first image appear in a dish of developer under the safelights in the college darkrooms in 1982.
It's easier to put contrast into a picture than it is to take it out, so those flat IR RAWs don't worry us too much, do they? Some judicious tweaking of curves and adjusting of black and white points still in the RAW convertor goes a long way to producing the goods. In Photoshop I'll then selectively tweak areas of the image to introduce local contrast. It's all a bit similar to the old game of dodging and burning under the enlarger, but with loads more control. Et voila, the image is done, ready to be printed and uploaded for the world to gasp at. How much of this IR stuff will I do? I guess there's definitely a novelty factor which will wane, and it's probably a project that works best at only certain times of year, chiefly spring and early summer, but now I've had the conversion done I'm going to carry on experimenting. I've a lot to learn.
Biography
Born in England in 1957, David spent much of his youth travelling with his family between the UK, California and Canada. After leaving school David joined the Navy in search of further travels and adventures – and it was while sailing the seven seas that his interest in photography grew. After several years at sea he decided to pursue his passion for photography and returned to study in Gloucester, England. After leaving college in 1985 he began work as a freelance photographer specialising in landscape and other travel subjects, which over the last 25 years, have taken him to almost every corner of the globe.
David is now established and recognised as one of the UK's leading landscape and travel photographers. His images sell all over the world – both as fine art photography and commercially in advertising and publishing. He has won international awards for: British Gas/ BBC Wildlife Photographer of the Year Awards in 1985,1989 & 1990 and also writes regularly about landscape and travel photography for a number of national and international magazines. David has worked for numerous clients including British Airways, Sainsbury's, Geo, Toyota, Qantas, Sunday Times and the Telegraph. During the last twenty years he has also worked extensively for the National Trust covering much of the UK's landscape and coastline, which has featured in many high profile publications and several highly acclaimed photographic exhibitions. Most notably:
‘New Vision' Contemporary Art Photography – AOP Gallery
‘The Coast Exposed' – Maritime Museum Greenwich and the Lowry
‘Climate Change – in Britain's Back Yard!' – London, Nottingham, Wales, Belfast, Bristol
“l'm still passionate about photography. All aspects fascinate me; from capturing the first light of day on a frosty landscape or making the most of a bustling market in Vietnam to portraying the dignity of a wrinkled face in China.”
David spends much of the year travelling with his wife Wendy. When not travelling they live in England, near Sherborne in Dorset.
DAVID NOTON’S CHASING THE LIGHT ROAD SHOWS
David has confirmed the first in a series of inspirational evening events – billed as ‘an evening of photographic discovery’ - taking place at the Olympus Theatre, WISE Campus, Filton College in Bristol, on 9th & 10th September. So to see David in action and find out more about his photography, book your tickets online now at http://www.davidnoton.com/roadshow.htm
Subscribe to:
Posts (Atom)